
In this Elder Scrolls Online Build Guide I am going to cover a Necromancer build for Veteran Maelstrom Arena. It is focused more on DPS, but has high enough surviveability to get you through all of the challenges, and I managed to clear it without using a single sigil. Considering that Maelstrom Arena is solo only, this build works for solo PvE play as well against World Bosses and the likes.
[h=2]Necromancer Maelstrom Arena Build Concept[/h]Maelstrom Arena is a special challenge, because just being good at one role is not going to be enough to get you through, so being good at everything at least to some extent is the key, without losing too much in each aspect. This build offers high survievability due to the Bone Goliath ultimate, powerful heals from the Leeching Plate Set, Resistant Flesh or Hungry Scythe skills, and huge DPS from Grave Lord Skills. The problem with VMA is that you are constantly on the move due to the mechanics, so classic dummy DPS results don’t mean much here.
 Maelstrom Arena has many unique mechanics so knowing what to expect means more than any build
Knowing boss and arena mechanics is far more important, and due to your near constant movement, it is nice to have as few spammable abilities as possible. The only ones that are spammed are healing abilities when it is necessary to do so, Ricochet Skull and Stalking Blastbones, so it shouldn’t be too complicated to keep paying attention to arena mechanics and abilities simultaneously. Remember that there are many ways to build Necromancer for Maelstrom Arena, so feel free to experiment to see what works best for you.[h=3]Necromancer Maelstrom Arena Attributes and Abilities[/h]For Maelstrom Arena I am favoring Magicka and Health, because damage received is a serious factor here. Some enemies like archers can do over 25k damage with Take Aim in one shot, so close to 30k should be minimum. That is why 25 points into Health should be minimum, and with your food buff around 29k Health. 29 points into Magicka, because if we run out of Magicka we cannot heal and that leads to quick death. It is better to have little bit more then you think it would be necessary, because some fights can be longer than others, and that leads to more Magicka being spent. 10 Stamina is enough for all dodging and interrupting, but should not be lower than that.

Necromancer has an amazing assortment of abilities that cover all 3 roles. DPS comes from Unnerving Boneyard, Ricochet Skull, Stalking Blastbones and Mystic Syphon. When moving is not required you can summon Boneyard beneath your feet and create a vicious circle of death that will annihilate anything in seconds. Beckoning Armor helps a lot here because it pulls ranged enemies towards you when struck. In this Boneyard AoE zone using Stalking Blastbones creates an explosion that damages everything in a small area, in addition to creating a corpse. Mystic Syphon is used on that corpse close to you to do more AoE damage, and then Ricochet Skull is spammed, with Stalking Blastbones in between. This combo does insane damage, but it can only be done when moving is not required.
 Summoning Unnerving Boneyard beneath you followed by offensive abilities creates vicious AoE zone that kills enemies fast
Healing comes from either Resistant Flesh or Hungry Scythe, and this is completely up to player. Resistant Flesh, with this setup, heals up to 16k if it crits, but puts Minor Defile for 4 secs. Thankfully we can clear that with Expunge if necessary. It also grants a buff for 3 seconds that boosts Physical and Spell Resistance for half of healing done with Resistant Flesh, which can be around an 8k bonus with this build. Hungry Scythe restores about 9k Health if it crits, and additionally around 3k over 6 seconds. It can restore more than this, but it depends on how many enemies it hits, and how high your Health is. The benefit and the problem when using Hungry Scythe, is that it needs to hit enemies in order to heal, which can be problematic at times. Hungry Scythe costs less than Resistant Flesh, so it can be spammed more often. You’ll have to decide which is the better fit for you.Our tankiness comes from Beckoning Armor, Resistant Flesh and the Bone Goliath Ultimate. All 3 ensure high surviveability, with the Ultimate making you nearly invincible for 20 seconds. Ultimate fills up quite fast with Necromancers, so you should be able to use this at least once every round.[h=4]Front Bar[/h]

Ricochet Skull – A direct damage dealing ability that Deals around 7000 Flame Damage with this build and every 3rd use of the skill has 20% increased damage and jumps to 2 additional enemies. I have chosen this upgrade over Venom Skull because Venom Skull is Stamina based and we need Stamina for Dodging and Breaking Free. Stamina is already on the low side so we do not need any more Stamina abilities. Morphed from Flame Skull.
 Stalking Blastbones – Summons a skeleton that rushes and explodes upon reaching the first enemy. Deals around 12k damage with this build but it can go up even more because it depends on the distance that the skeleton travels. This is our primary corpse source and that is why we are going to use this ability every opportunity that we get. The Stalking Blastbones upgrade is better for this build because Blighted Blastbones is a Stamina ability and for reasons mentioned above it is not preferred. Morphed from Blastbones.
 Mystic Siphon – Uses a corpse to create an AoE that does about 22k damage over 12 secs with this build. The tether effect isn’t there just for show either, and anyone caught in between you and a corpse that is tethered is going to receive damage as well. So basically anything in front of you is affected unless the enemy is too far away from the corpse. Over 12 seconds around 2800 Magicka gets restored as well. While slotted it increases damage done by 3%. Morphed from Shocking Siphon.
 Resistant Flesh or Hungry Scythe – This is your healing ability that is going to be used a lot. As I have explained above, both are great options. The higher Health pool you have, the better Hungry Scythe becomes. Resistant Flesh’s upgrade increases Physical and Spell Resistance, which helps mitigate damage. Morphed from Render Flesh and Death Scythe.
 Inner Light – While slotted Max Magicka is increased by 5% and you get permanent Major Prophecy, that increases Spell Critical by around 2k. With the Magica Controller passive we get 2% more to Max Magicka and also 2% more Magicka Recovery. Morphed from Magelight.[h=4]Back Bar[/h]
 Unnerving Boneyard – Creates an AoE that does over 20k damage over 10 secs with this build, and this upgrade applies Major Breach and Fracture in the area affected. Very useful when fighting more enemies. If there is a corpse available while activating this ability then the damage is increased by 20%. Morphed from Boneyard.
 Beckoning Armor – Grants Major Ward and Resolve, increasing your Physical and Spell Resistance by 5280 for 17 seconds. A must have for any Necromancer. This upgrade pulls ranged enemies while this skill is active. Very useful against large groups of enemies to gather everyone near you so that you can nuke them with AoE skills. Morphed from Bone Armor.
 Spirit Guardian – Summons a Spirit that restores health every 2 seconds. This upgrade transfers 10% of damage you take to the Spirit, making it ideal for Maelstrom Arena. Upon death the Spirit leaves a corpse on the ground that can be consumed with Mystic Syphon. Morphed from Spirit Mender.
 Expunge and Modify – Removes up to 2 negative effects and restores 500 Magicka and Stamina per each effect removed. A very useful resource management skill, however, be careful because this skill costs Health, so don’t go overboard with it. While slotted reduces cost of Skills by 3%. Morphed from Expunge.Inner Light – While slotted Max Magicka is increased by 5% and you get permanent Major Prophecy, that increases Spell Critical by around 2k. With the Magica Controller passive we get 2% more to Max Magicka and also 2% more Magicka Recovery. Morphed from Magelight.[h=4]Ultimate Skills[/h]
 Ravenous Goliath – As mentioned at the start of this section, this skill is fantastic in every possible way. 30k Heal, 30k Max Health increase, Light and Heavy attacks heal, AoE that hurts enemies and heals you… And it scales with Max Health. Invulnerability mode activated. The Goliath Ultimate can be used with this build almost every round and that is extremely helpful. Morphed from Bone Goliath Transformation.
 Shooting Star – It does significant damage, stuns and knocks back enemies. Generates 12 Ultimate for each enemy hit so using it versus many enemies is preferable. It won’t be used nearly as much as Goliath but it is nice to have a pure DPS Ultimate if you are doing alright without Goliath form. Morphed from Meteor.[h=3]Necromancer Champion Skills[/h]There are plenty useful Champion Skills you can have, but points are limited. Percentages behind the decimal point are not accounted for when adding points to Champion Skills. For example, Elemental Defender at Rank 60 reduces damage taken from elemental attacks by 12.57%, but your gain is actually 12%. Now that you know this you can save points and put them elsewhere where gains would be more beneficial. Try to round up numbers to get the most out of these Champion Skills.Here is my recommended setup for the Necromancer Maelstrom Build:[h=4]Warrior[/h]Ironclad 56
Spell Shield 35
Hardy 43
Elemental Defender 43
Thick Skinned 37
Quick Recovery 56
[h=4]Thief[/h]Warlord 37
Sprinter 9
Arcanist 56
Mooncalf 56
Tumbling 56
Shadow Ward 56
[h=4]Mage[/h]Elfborn 56
Elemental Expert 56
Blessed 24
Spell Erosion 22
Master-at-Arms 56
Thaumaturge 56
[h=3]Necromancer Maelstrom Gear[/h]Weapons that we are using are Staves. Fire or Lightning, it does not matter. Ranged weapons are good for Maelstrom arena because weaving light attacks helps in the killing of far away enemies faster. One example would be Rink of Frozen Blood that has trolls that smash platforms so attacking from distance is much safer than having to go through frozen water that does significant damage.[h=4]Resource Management Sets[/h]There are many Sets that work here, and I would advise wearing anything that reduces ability cost because running out of Magicka, means quick death. Magnus’ Gift and Crafty Alfiq can help a lot in managing Magicka if you don’t have access to some of the better gear in the game. Either one of these works well.

 The Trial Set that I would recommend for this purpose is definitely, if you can get it, is False God’s Devotion. The 8% cost reduction is just too good, you regain Magicka when you kill enemies, and increase your Movement Speed. All of these things are extremely helpful for VMA.
[h=4]Tank Sets[/h]My choice for a Tank Set here is Leeching Plate. It deals a small amount of damage but its heals are significant which will save lots of time, and more heals from this set means less Magicka used for healing skills as well. It is possibly the best self sustaining set in the game, and that is exactly what we need for Maelstrom Arena.

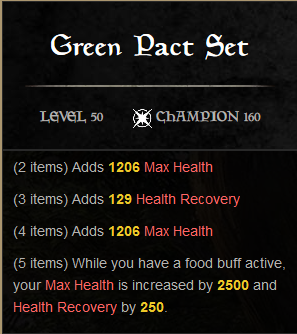
Alternatives to Leeching Plate are many, but it should remain Tank oriented if possible. Akaviri Dragonguard reduces Ultimate cost, which helps to get into Goliath Form faster, and the Set is rather easy to obtain. Health boosting sets like Warrior-Poet or Green Pact are also good choices, if not quite as good.

 The Monster Helm that works best for this setup is Blood Spawn, because the additional Ultimate generation helps tremendously, and it does give you more Physical and Spell Resistance. The more times you can enter Goliath Form the better.
Other then Bloodspawn sets like Ilambris, Valkyn Skoria and Zaan are good for DPS, and something like Scourge Harvester is awesome for added surviveability. So if you don’t have Blood Spawn, consider using one of these.[h=3]Final Thoughts[/h]Veteran Maelstrom Arena is quite a challenge, but this build can take you through it without using any sigils. It is a somewhat balanced build with perhaps some focus on DPS. Due to the versatility of Maelstrom Arena Builds, there are many Mundus Stones that are good here, but The Shadow, The Lord and The Mage are my top choices.
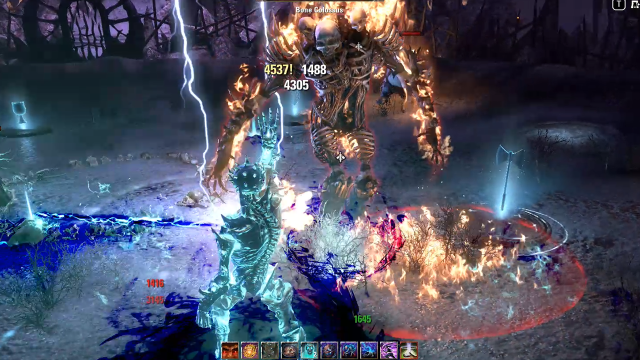 Ravenous Goliath is fantastic ultimate for Maelstrom Arena and with this build you can have it every round
There is no rotation section because Maelstrom works differently and usual rotations do not mean much. Try to have Spirit Guardian and Beckoning Armor active as much as possible, but even that can be challenging at times because healing is priority, and that can remove any semblance of rotation. Even with a good Build, understanding Arena mechanics takes priority because even Goliath Form won’t save you from certain death if you are going about it all wrong.[HR][/HR]Stay tuned for more ESO Build Guides and more ESO content through out June as we explore Elsweyr.The post ESO Necromancer Maelstrom Arena Build appeared first on Fextralife.
More...