
Recently I’ve been streaming a bit of Elder Scrolls Online on Twitch, and one of the more frequent questions I’m asked is “What is a good Class for a new player?”. While just about any Class can be played well from the beginning, I happen to be slightly biased towards the Templar, since it’s my main. It also happens to be very good for new players, particularly those who don’t know if they want to Tank, DPS or Heal. In this article I want to show you my Universal Templar Build, that allows you to swap between roles at will, without having to change your Attribute or Champion Points.[h=2]ESO Builds: The Universal Templar Concept[/h]The Universal Templar works by allowing you to swap your gear for the role you desire to play, while still being effective. You of course, won’t be 100% optimized, but you’ll be very close, and most content does not require 100% optimization any way. So, if you don’t plan to run Veteran Trials, and you can’t be bothered to spend gold every time you want to do something different with your Templar, then this Build is for you. Let’s start with Attributes.
[h=3]Universal Templar Build Attributes & Champion Points[/h]Attribute spread for this Build is extremely simple, and all Points will be placed into Magicka. This is done for a few reasons. First, when leveling up or questing you will want higher damage or it will take forever, and having high Magicka contributes to harder hitting attacks. Second, you need a good chunk of Magicka to tank as a Templar, and this allows you to use Sets that focus 100% on Health and Stamina while still having the needed Magicka. And third, if you want to heal then you should play a Magicka-based Build, so this prevents a setup that uses Stamina as its main Attribute.
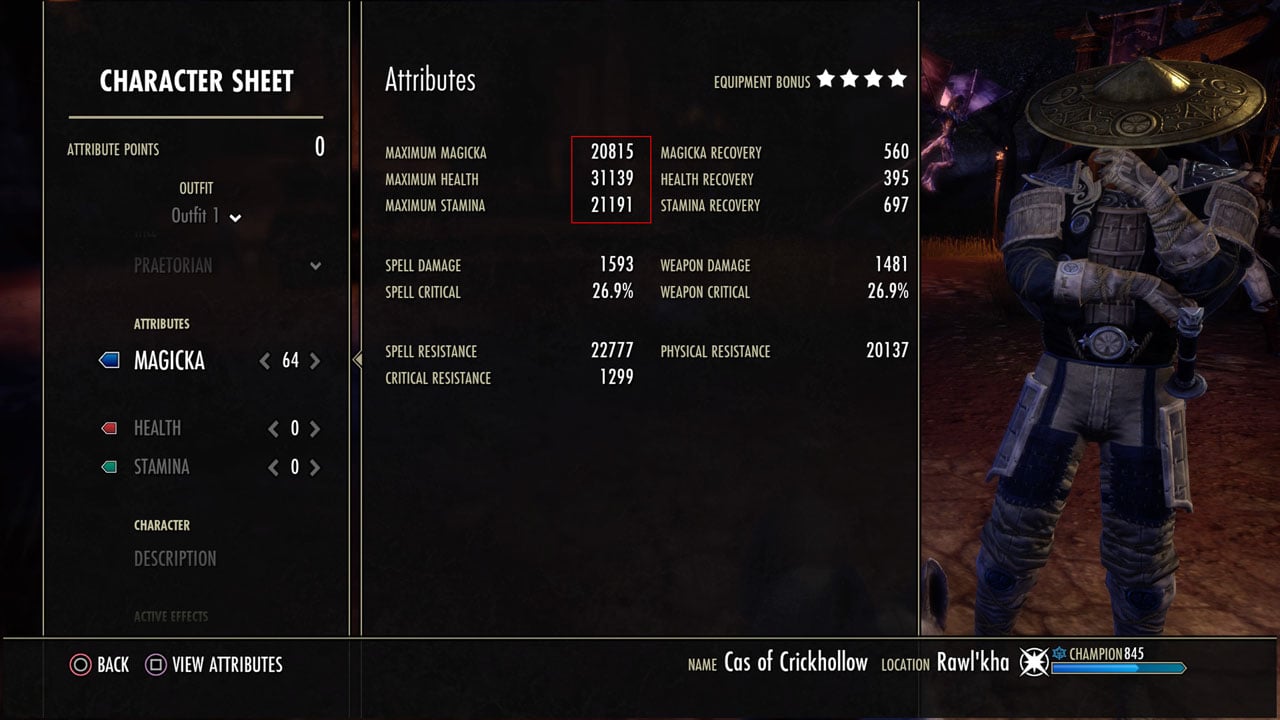
 What my stats look like before food. I use Braised Rabbit with Spring Vegetables to add 5395 Health and 4936 Stamina, which puts Stamina higher than Magicka.
Champion Points are allocated in a manner that allows for Healing, DPS and Tanking, as well as PvP. Champion Points are the weakest area of the Build, because any Build focused on a specific type of role and play will have increased performance simply from their allocation. However, this setup is good enough to get you through all content except Veteran Trials, and this is because of diminishing returns. Champion Points are as follows:[h=4]Fighter Skills[/h]Iron Clad 66
Resistant 54
Hardy 37
Elemental Defender 38
Quick Recovery 37
Bastion 38
[h=4]Thief Skills[/h]Warlord 51
Arcanist 38
Mooncalf 43
Shadow Ward 51
Befoul 71
Shade 22
[h=4]Mage Skills[/h]Blessed 43
Elfborn 51
Elemental Expert 43
Spell Erosion 31
Master At Arms 51
Thaumaturge 51
With this setup you get a decent mix of healing, surviveability and damage. In addition, there are tools here for PvP in the form of Resistant, Befoul, Shade and Warlord, which are all very good to have out in Cyrodiil. When leveling you want to spread your points around a bit in order to gain the most from each passive. Just make sure that you try to gain exact percentages, or as close as you can, as percentages after the decimal point are not applied. For example, if you have 5.76% Magicka Recovery, you only gain 5%.

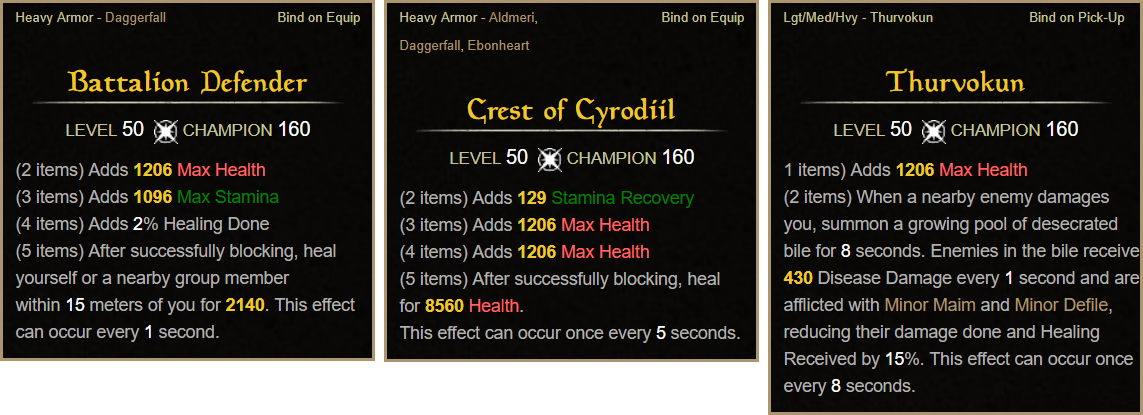
[h=3]Universal Templar Tank Setup[/h]The first role we’ll cover here is the Tank, because it’s the most important gear wise. In order to make this work, you’ll need to use a combination of Sets that allow you to have just a bit more Stamina than Magicka on your front bar, and a bit more Magicka than Stamina on your back bar. The best way to accomplish this is by using Sets that have lots of Health on them, and a bit of Stamina. You can then use Health/Stamina food to boost both these Attributes even further, which should put you over the amount of Magicka that you possess.It is crucial that you do this because you want to be able to gain Stamina from Shards and Orbs while on the front bar, and Magicka while on the back bar. If you end up with more Magicka than Stamina on your front bar, you’ll likely run out of Stamina from Blocking when facing more difficult content. The setup that I use is Crest of Cyrodiil, Battalion Defender, and Thurvokun (7 pieces of Heavy Armor). All Armor pieces have Maximum Health Enchantments, and both Rings and Necklace have Shield-Play Enchantments. My Shield has Maximum Stamina Enchantment, which allows me to be just higher on Stamina, but then when I swap Weapons, to be just lower.
Race is very important when getting this setup to work! I am a High Elf, with a bonus to Maximum Magicka, so if you’re another Race who has a bonus to Stamina, you will likely be able to change some of these Enchantments to Prismatic ones, increasing your Magicka pool as well. This might take a bit of trial and error, but your Glyphs are the best way to control just exactly how much of each Attribute you have, if you are using these Sets. You can also Transmute the Traits on your Jewelry if necessary, and mine all have Stamina, but this can be expensive. Note that for this Build, Races that have Magicka bonuses are preferred, because you will be Healing and DPSing with Magicka-based Skills.[h=3]Templar Tanking Tips[/h]When making any Tank one thing you do not want to worry about is Stamina Recovery. At first glance it seems like an important stat, because without Stamina you cannot Block, and if you can’t Block then you die. However, Stamina Recovery doesn’t occur while Blocking, and there are some fights you frankly just can’t let go of Block. For this reason, try to avoid gear that has this Stat on it if you can. One of the Sets I use has it, but the 5 piece bonus more than makes up for it.Templars will regain their Stamina a few ways (besides Shards and Orbs). Firstly, players who wear Heavy Armor passively gain 108 Stamina (and Magicka) each time they are struck by an attack, once every 4 seconds via the Constitution Skill. The amount increases with each piece of Heavy Armor, all the way up to a maximum of 757 if you have 7 pieces equipped. This is part of the reason we wear all Heavy Armor, as this translates to 378 Stamina and Magicka Recovery, but works even if holding Block.Second, Repentance is a very helpful Skill for regaining Stamina when enemies around you die. However, it is very situational, and I like to use it mostly after each trash pull to top up, so that I have full Stamina on every one. This is why I keep this Skill on my back bar, but you will use it during some boss fights that have a number of minions with them.
 Restoring Focus is ideal for Templar Tanks, but isn’t for Healers and DPS, so we use Channeled instead. This will help you keep up Radiant Ward, so isn’t a bad substitution.
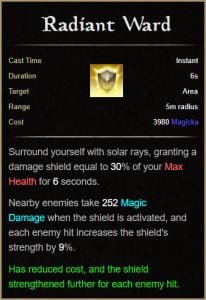
Lastly, Heavy Attacks. Be sure to Heavy Attack when you have an opening where you don’t need to Block, since you can’t Block and Heavy Attack at the same time. This will net you somewhere around 2k Stamina, which goes a long way, particularly if you can get in a few in a row.Restoring Focus would provide us with 240 Stamina every 1 second that it is active, which translates to the equivalent of 480 Stamina Recovery, even while Blocking. However, we don’t use it with this setup because it does not work well with the Healer and DPS roles. Instead we use Channeled Focus, which provides Magicka. This is less useful to a Tank, though still good for keeping up your Radiant Ward.Keep up Radiant Ward as much as you can. This Damage Shield really helps prevent you taking damage in the first place, while dealing modest damage at the same time. Healers get stressed out when Tanks take huge hits, and keeping your Health as close to max as possible will allow them to relax and help DPS. This Skill makes you really hard to kill, and you should have a decent amount of Magicka because of all the Attribute Points there, Channeled Focus and Constitution.
[h=3]Universal Templar Healer & DPS Setup[/h]I’ve combined the Healer and DPS here because they are pretty straight forward when it comes to gear. You do not need to pay attention to any Stat balances in either of these two setups, but want to focus on high Magicka and Spell Damage, in order to maximize your Healing or DPS.For Healer you’re going to likely use any set that boosts Spell and Weapon Damage of your group, like Spell Power Cure or Vestments of Olorime, in combination with Worm Cult or another healing oriented Set. Your Monster Helm Set should be one that heals like: Chokethorn or Earthgore.For DPS you’ll want to use Sets that boost your damage as high as possible. Good Sets include: Law of Julianos, False God’s Devotion, Mother’s Sorrow, Bright-Throat’s Boast and others. For a Monster Helm you can use Grothdarr, Slimecraw, Valkyn Skoria, or Zaan.
 There are many good Monster Helms for DPS and Healer. Be sure to check the Wiki to see what they are.
[h=3]Templar Healing Tips[/h]Besides the usual Healing Springs and Mutagen spam, you’ll be using Spear Shards to provide Stamina to your Tank, and Necrotic Orb to provide resources to your DPS. Don’t be shy when using them, because the harder your DPS can burn, the faster everything dies and the less healing you need to do.Keep up Channeled Focus at all times to help with your Magicka Recovery, and try to remain inside it if possible to boost your Resistance further. It costs very little Magicka, so don’t be afraid to place it often, particularly if you are in a fight that requires a lot of movement (like PvP).Heavy Attack with your Restoration Staff when you need Magicka and your group isn’t in danger. You gain extra Magicka from using the Restoration Staff Heavy Attack when compared with a Destruction Staff because of the Cycle of Life passive. In addition, you will gain Major Mending for 3 seconds, and will heal your Tank for a percentage of the damage done.

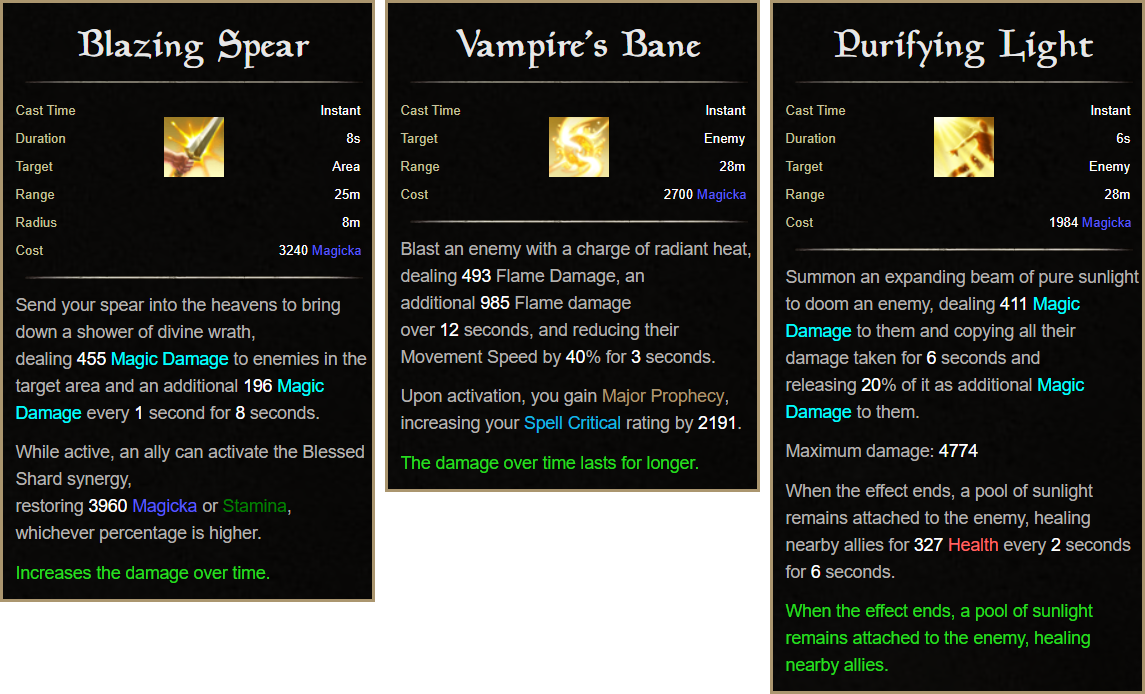
Breath of Life is your panic button, and you’ll use this to save players that are in danger, but also be sure to keep Extended Ritual down for a small heal over time, and to provide a cleanse to your group. Ritual of Retribution is better for PvE, but because this setup also includes PvP we use Extended.[h=3]Templar DPS Tips[/h]Be sure to keep Blazing Spear down at all times to further boost your DPS. This Skill does amazing damage, and when stacked with other AoEs like Wall of Elements, you can really crank out some good numbers. I like to spam this during trash pulls, as the initial hit is very high, and kills things very quickly if excessive Magicka consumption is not a concern. It also procs Burning Light, which further increases its effectiveness.Vampire’s Bane and Purifying Light are very good against bosses, and you want to keep them up permanently if possible. Vampire’s Bane will increase your Critical Strike Chance, and Purifying Light will provide a small heal around the target after it expires. The heal is much more useful in PvP than PvE, but every little bit helps.
Radiant Oppression is your go-to execute skill and you’ll want to use this when bosses or players get low on Health. This skill is “undodgeable”, so works particularly well against Stamina-based PvP Builds that tend to roll around a lot. If you find you are having difficulty with them, which you likely will as a Templar, then abuse the hell out of this Skill.[h=3]Final Thoughts[/h]The Universal Templar will let you play 99% of the content that Elder Scrolls Online has and still be effective. I would not recommend doing Veteran Trials with this setup, but you likely could if you had a good enough knowledge of their mechanics, and you had a full group of others that were built specifically for it.Unfortunately there is no “Stamina-based” version of this Build, because although it would work for DPS and Tanking, Stamina Healers are not effective in most cases. They are also not new player friendly, making it advisable for only very advanced players, and those players likely have no need of Build advice. You can make a Build that can alternate between DPS and Tank effectively if you don’t plan to heal, but you won’t be able to do all 3 roles.
 Echoing Vigor is really the only Stamina Heal in the game, and you need to PvP a bit to get it.
Do not mistake failings in PvP for issues with this Build. PvP has a very very steep learning curve, and it will take you months to get good at it, depending on how much you play. A lot of playing in Cyrodiil is about learning where to be and when, and when to engage and when to avoid conflict. These things are learned over time, in addition to learning how to deal with certain cancer Builds, and various groups. This Build works fine for PvP, but it’s not made specifically for it, so if that’s all you play then consider a different one.Lastly, you can do this for other Classes as well, if you follow the same concepts. Obviously the tips about Skills and whatnot will be different, but the general idea will work the same. I actually plan to do this for each Class, so if you play something other than a Templar and want to know how to do this in detail keep an eye on the channel. Also, we’ll have our Scalebreaker Breakdown Video up soon, so if you want to know what changes are coming, stay tuned for that.The post ESO Builds: The Universal Templar (PvE & PvP) appeared first on Fextralife.
More...